Bitscout Management Tool
Using Bitscout management tool on physical console

Written by Vitaly Kamluk
6 minute read
This article describes various features of Bitscout management tool: the text-UI tool to be used by the system owner. Because by default we removed absolute trust to the remote expert to protect the interest of the system owner, some parts of the remote analysis has to be authorized by the user with access to the physical console where Bitscout is started.
Overview
Bitscout management tool starts automatically with the system boot and displays the main menu.
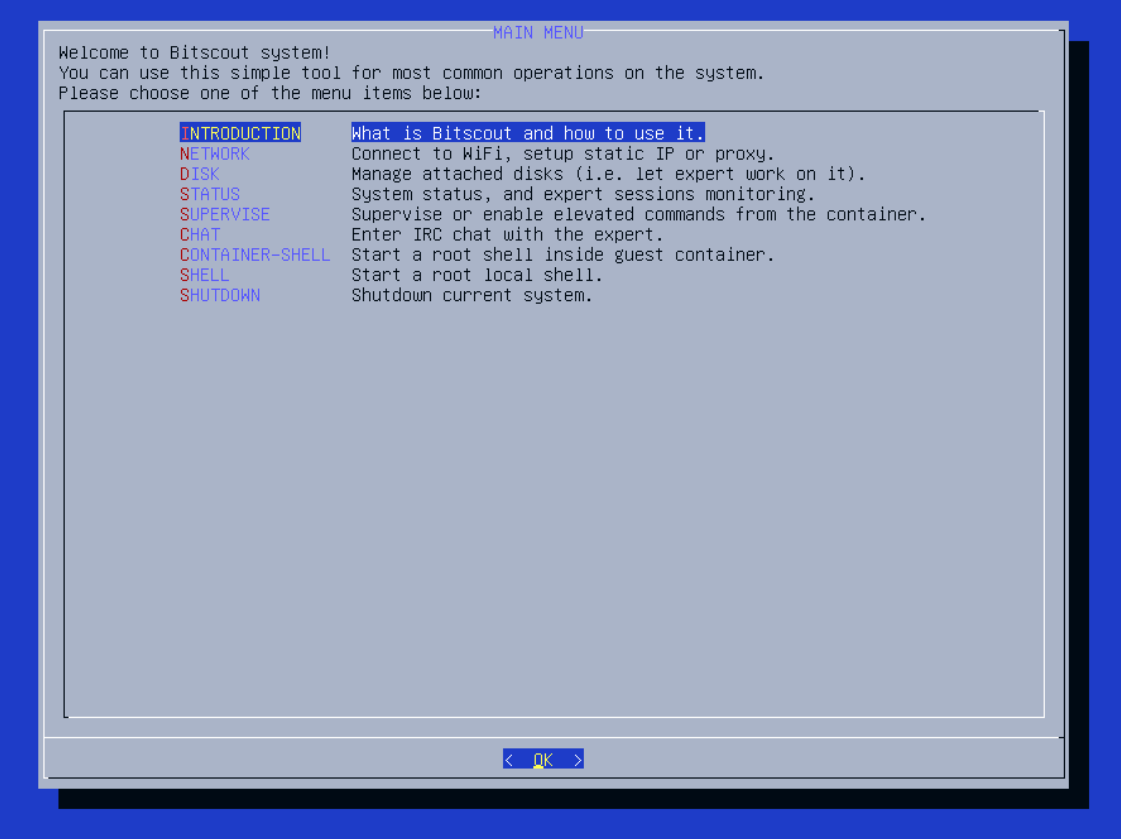
To navigate, the user is expected to use keyboard arrow keys, Enter (to push the selected item), and Space (to mark the checkbox). The tool is mostly self-explanatory and contains short comments to the right of each menu item, however, we would like to go through some of the items and provide detailed explanation.
NETWORK
This submenu should only be used when the remote expert cannot connect to the system. If you are not connected via cable Ethernet, require proxy server address and credentials, this is where you may set them. Note that this settings, including proxy server address credentials or WiFi passphrase, are used on the Bitscout host system and will only be used to let VPN connect to the expert server. The expert operates inside the container where none of this data is visible.

NETWORK / WIFI SETTINGS
If you use WiFi to connect to the global network, you should use NETWORK / WIFI SETTINGS submenu (currently is being re-implemented for Bitscout 20.04).
NETWORK / ENABLE HOST CONTROL
The next item NETWORK / ENABLE HOST CONTROL enables SSH connections from the expert to the Bitscout host system. Note, that by enabling this feature you allow the expert to take full control over the host and do anything with the attached devices on you behalf. This way the expert doesn’t need to use container at all, and if such level of trust is established it makes sense to shutdown the container completely. The expert may do this with the following command executed on Bitscout host:
# machinectl stop container
The host SSH service is available on TCP port 23, instead of standard TCP port 22 (used for SSH service inside the container).
This change is revertable. Once you want to disable host control, feel free to select the same item, which by that time will be called NETWORK / DISABLE HOST CONTROL.
NETWORK / ENABLE ACCESS FROM LAN
At time when Bitscout should be used by direct access via LAN (not over VPN), this option changes Bitscout host firewall to enable such access. This is especially useful when you want to test Bitscout on your VM and prefer to SSH to it bypassing VPN.
Another useful scenario is when you need to work with one or more hosts in your LAN. We had cases when we needed to clone a drive of a server that used enterprise hardware RAID controlled. Lack of an identical controller may prevent you from taking an image of the harddrive. This way you could start the server from Bitscout CD/USB and connect over SSH directly via LAN. After we attached an external USB HDD to the server, we could start disk imaging, while monitoring the progress from another room (server rooms can be quickly chilling).
Note, that this submenu is affected by the previous one (NETWORK / ENABLE HOST CONTROL). If the host control is enable, then enabling access from LAN will allow the expert to connect to the Bitscout host directly. While user/root passwords are empty on Bitscout hsot and container, SSH allows connecting to the system only when you use proper SSH key. That means, exposing the SSH port itself does not mean opening a door to anyone in your LAN and should not be considered as high security risk.
This change is revertable. Once you want to disable access from LAN, feel free to select the same item, which by that time will be called NETWORK / DISABLE ACCESS FROM LAN.
NETWORK / STATIC IP
If the owner’s network doesn’t support DHCP and IP address must be set manually, this is where you can do it. After entering this submenu, you will be presented with the list of your local network interfaces (excluding loopback, vpn, and container interface). There should normally be only your physical Ethernet and WiFi interfaces. Once you choose the network interface to configure and continue, you will be presented with the dialog to set static IP, gateway, and DNS server settings, like shown below:
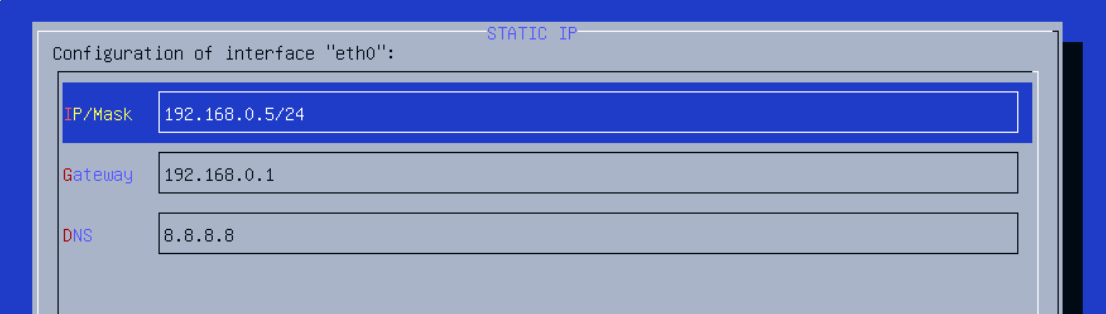
Please, be careful with Enter button, because it is applied to the current selected row and current highlighted button on the bottom of the dialog. Select the IP/MASK and make sure that <EDIT> is chosen before hitting Enter and editing the value.
Note, that if for some reason you need to switch from static IP back to DHCP, you just need to leave IP/MASK field empty. The tool will switch the system to getting IP, gateway, and DNS from a DHCP server.
NETWORK / HTTP PROXY (SOCKS PROXY)
If using HTTP/SOCKS proxy is required to access the Internet this is where server address, port, and credentials can be set. Entering this menu allows to set this settings, which will be applied to OpenVPN service on the Bitscout host, followed by its immediate restart.
An example of such settings for HTTP proxy:
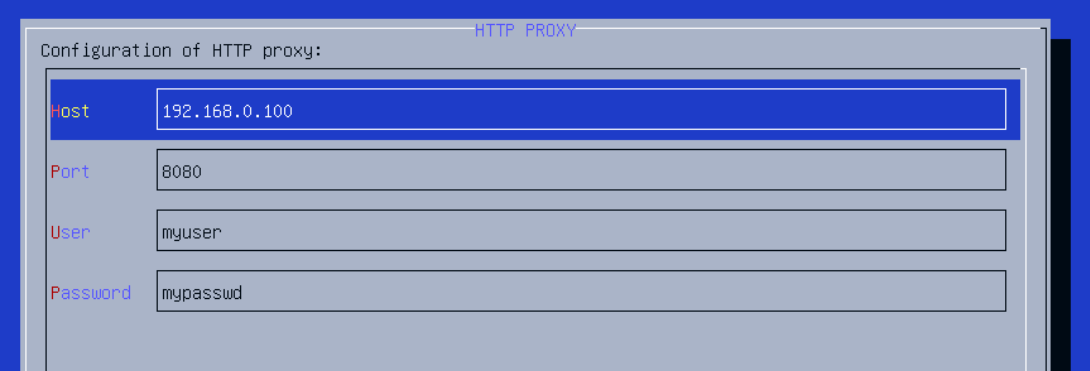
Please note, that by entering your credentials, you do not expose them to the expert, unless you provide the expert with access to the Bitscout host (via ** NETWORK / ENABLE HOST CONTROL** ).
TO BE CONTINUED…
Still Need Help?
Bitscout Bugs
If you find any bugs or problems with the project, please open an issue over on Github.
GithubFeel free to tweet at me if you have suggestions for Bitscout. Or if you just want to say hi.
Twitter